Set Up HolyTech on Android
This guide will walk you through the step-by-step process of downloading, installing, and configuring the HolyTech client on your Android phone or tablet.
1. Download and Installation
Click the link below to get the official HolyTech installation package for Android:
Once the download is complete, tap the APK file to begin the installation.
If your system prompts a security warning or requests permission to "Install unknown apps", please follow the on-screen prompts to allow it and proceed.
After installation, you can find the HolyTech app icon on your home screen or in your app drawer.
Security Tip:
Some Android systems display a routine security warning for apps downloaded outside the official app store. As long as you downloaded the file via our official link, it is completely safe to proceed with the installation.
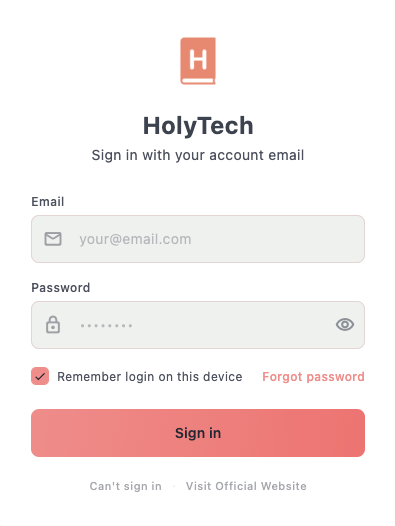
2. Log in to Your Account
Open the HolyTech application.
In the login fields, enter the Email Address and Password you used when registering on our website.
We recommend checking "Remember login status" to enable automatic login for future sessions.
Tap the [Log In] button to access the main dashboard.
If you forget your password, tap the "Forgot Password" link and follow the prompts to reset it.
If you encounter any issues logging in, use the "Contact Support" or "Visit Website" features to get technical assistance.
3. Select a Node and Connect
Once successfully logged in, the system will direct you to the HolyTech dashboard.
Tap "Select Node" on the home screen.
Choose any available route from the list (it is recommended to prioritize nodes with lower latency).
After selection, return to the app home screen.
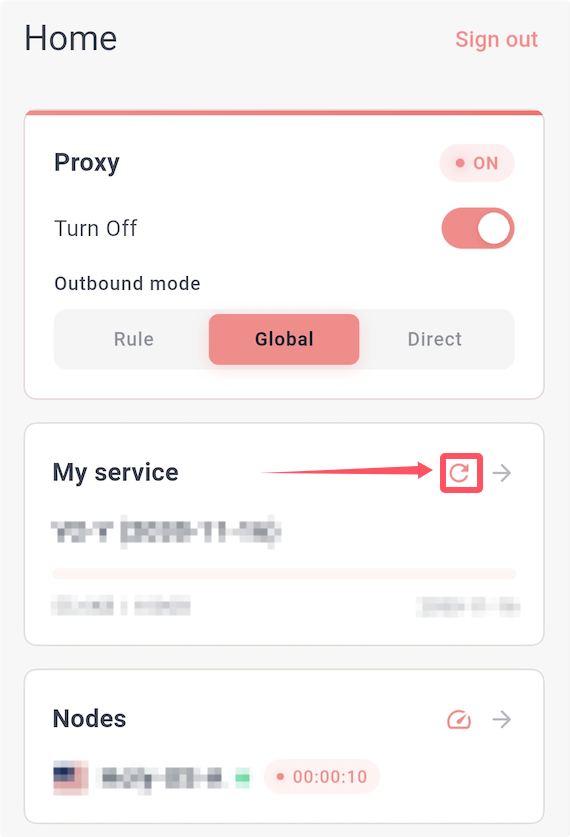
In the "Proxy Control" section, toggle the switch to enable the service.
Once the connection is established, a VPN icon will appear in the status bar at the top of your screen, indicating that the proxy is active.
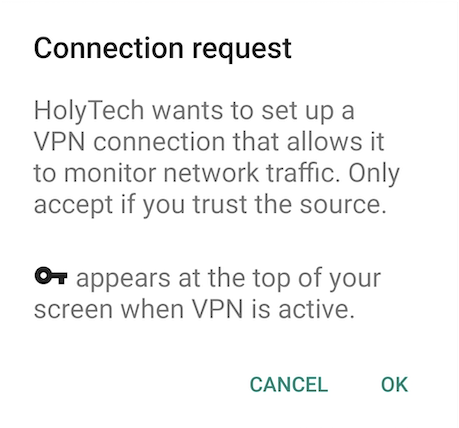
4. Grant VPN Connection Request (First-time Users Only)
When you start the connection for the very first time on your device, the Android system will prompt a standard VPN connection request for security purposes.
System Authorization Prompt Example:
HolyTech wants to set up a VPN connection that allows it to monitor network traffic. Only accept if you trust the source.
Please tap [OK] or [Allow] on the system dialog box that appears.
Once authorized, HolyTech will run in the background to encrypt and route your network traffic.
Please note that if you deny this permission, the app will not be able to establish a proxy connection.
Additional Information:
This is a standard mandatory action regulated by the Android OS. HolyTech utilizes a local VPN tunnel to achieve traffic routing. Please click OK with confidence to authorize it.
5. Choose Routing Mode
On the HolyTech home screen, you can adjust the "Routing Mode" to match your current network preferences:
Rule Mode (Highly Recommended): The system smartly analyzes your traffic to split it automatically. International websites will go through the proxy nodes, while local apps and websites remain direct, saving data limits and ensuring optimal local network speeds.
Global Mode: Forces all network traffic from your device to go through the selected HolyTech node.
Direct Mode: Bypasses the proxy client entirely, using your regular mobile data or Wi-Fi network directly.
Best Practice:
We recommend keeping the app on "Rule Mode" for a seamless and efficient browsing experience every day.
6. Sync Subscription and Update Nodes
If you encounter any of the following scenarios, we recommend manually updating your subscription information:
- You just purchased a new plan or changed your account subscription.
- You just renewed your plan, but the expiration date inside the app hasn't updated.
- Official node changes have occurred, and you need the latest line configurations.
- The remaining data limit counter seems frozen.
Return to the HolyTech app home screen.
Locate the "My Services" information card and tap the [Update] or [Sync] button next to it.
Wait a few seconds for the synchronization to finish. You will then see your updated plan balance, expiration date, and the newest node list.
7. Verify Your Connection
Ensure that the proxy switch is enabled and the VPN icon is visible in your phone's top status bar.
Open your mobile browser and try accessing a website that was previously unavailable to test the connection.
You can also open other apps to verify that your global network access is functioning at expected speeds.
Frequently Asked Questions (FAQ)
1. What should I do if my system blocks the APK file and warns about an unknown source?
This is a standard Android built-in security routine for files downloaded outside the official store. As long as you downloaded the file from our official tutorial page, feel free to choose allow or trust to proceed.
2. What credentials should I use to log into the app?
Please enter the exact Email Address and Password associated with the account you registered on our platform.
3. Is the VPN connection request safe when opening the proxy for the first time?
Absolutely. It is a mandatory operating system prompt. HolyTech relies on this local permission to route and optimize your traffic, so clicking [OK] is required for it to function.
4. Why does a key or VPN icon appear in my status bar when enabled?
This is standard behavior indicating that the HolyTech secure tunnel has been successfully established and is actively running in the background.
5. Which routing mode should I choose?
In almost all daily situations, "Rule Mode" is the ideal choice. It guarantees rapid access to international websites without slowing down your domestic network services.
6. I just renewed my plan or topped up, but the app shows no change?
Go to the HolyTech home screen, find the "My Services" card, and tap the "Update" button to sync with the backend server. If the data still hasn't updated, try logging out and logging back in.
Once you have followed these steps, you are completely set up to enjoy free and secure internet access on your Android device!